Preparing Your Car for a Paint Correction Service
Table Of Contents
Inspecting for Damage
Before initiating any paint correction service, a thorough inspection of the vehicle's exterior is essential. This step helps identify pre-existing damage that needs attention. Start by examining the entire surface for any signs of scratches, swirl marks, or deeper paint imperfections. This initial assessment sets the stage for an effective correction process, ensuring that all necessary areas are accounted for.
In addition to visual checks, consider different lighting conditions to uncover hidden flaws that may not be visible in sunlight. Using a high-intensity LED light can reveal minor abrasions and paint imperfections that can be overlooked under regular lighting. Being meticulous during the inspection phase allows for a more tailored approach to paint correction, ultimately enhancing the final results of the service.
Checking for Scratches and Swirl Marks
Scratches and swirl marks can greatly affect the appearance of your vehicle's paintwork. To detect these imperfections, a careful visual inspection under adequate lighting is essential. Look for fine lines or circular patterns that catch the light differently than the surrounding surface. Using your hand, you can also run your fingers over the paint to feel for any roughness that may indicate deeper scratches.
Documenting the location and type of flaws observed will help in assessing the extent of the paint correction needed. A flashlight can enhance visibility, highlighting scratches and swirl marks that may not be immediately apparent. Pay close attention to high-contact areas like the bonnet, boot, and door edges, as these are often the most vulnerable to damage. Proper identification of imperfections ensures a more focused and effective paint correction process.
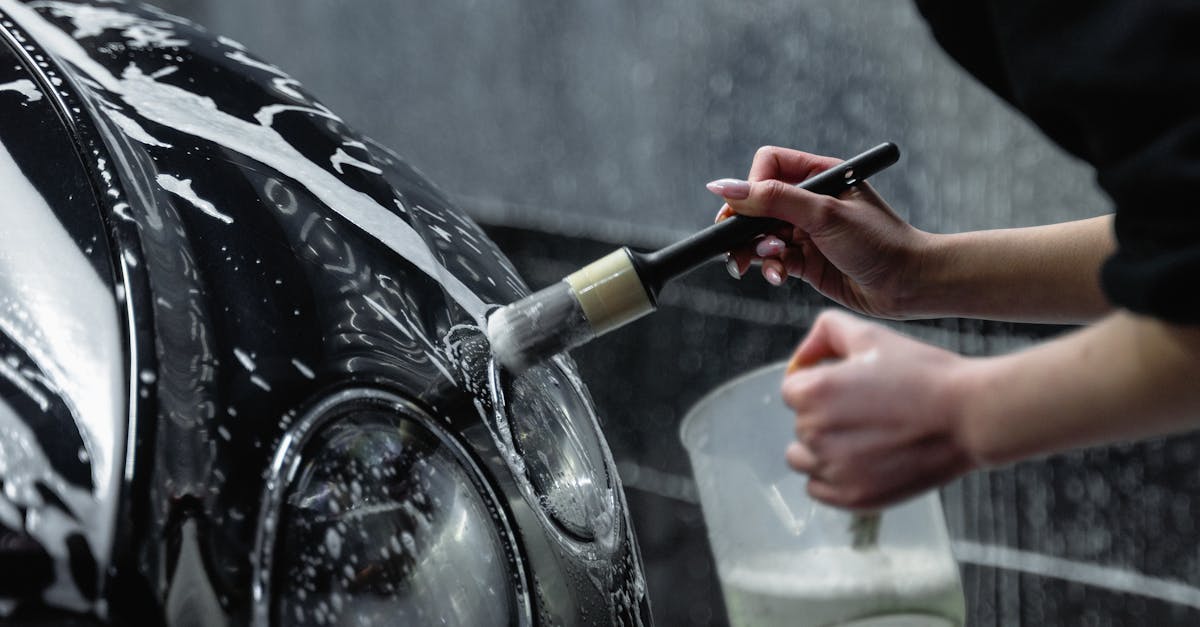
Preparing the Paint Surface
A clean surface is essential before any paint correction can take place. Begin by thoroughly washing your car to remove dirt, grime, and contaminants that might interfere with the correction process. Use a pH-balanced car shampoo and a microfiber wash mitt to gently cleanse the paint. Pay close attention to areas where dirt often accumulates, such as around wheel arches and under the side mirrors. Rinse well and dry the car using a soft, lint-free towel to prevent water spots.
Once your vehicle is clean, it's time to address any embedded contaminants that regular washing may not have removed. A clay bar treatment is highly effective at decontaminating the paint surface. This process involves using a polymer clay that glides over the surface to lift and remove stubborn particles like tar, tree sap, and industrial fallout. Lubricate the surface with a dedicated clay lubricant to avoid marring the paint while you work. Regularly inspect the clay bar for dirt and reshape it to ensure you are using a clean section for maximum effectiveness.
Decontaminating with Clay Bars
Before a paint correction service, it’s essential to ensure the vehicle's paint is free from embedded contaminants. Using a clay bar can effectively remove surface impurities such as grime, sap, and overspray that regular washing may not eliminate. The process involves lubricating the paint surface with a detailing spray to prevent scratching and then gently gliding the clay bar over the surface. This action will reveal the true condition of the paint, making any imperfections easier to assess.
After the decontamination, the paint surface should feel smooth to the touch. Inspecting the clay bar can highlight how much contamination was present before the correction process. Regularly kneading the clay during the application helps expose clean surfaces, ensuring that every part of the vehicle is adequately treated. Taking the time to perform this step enhances the overall effectiveness of the subsequent paint correction.
Masking Areas Not to be Corrected
Masking is a critical step that ensures only the desired areas are treated during the paint correction process. This prevents any accidental damage to components like rubber trims, plastic parts, and sensitive areas around headlights or taillights. Using high-quality masking tape designed for automotive applications provides a clean edge and prevents paint bleed, which is essential for achieving a professional finish.
To maximise effectiveness, ensure the surface is clean and dry before applying the tape. Press firmly along the edges to secure the tape in place, paying attention to any curves or contours of the vehicle’s bodywork. A sharp utility knife can be helpful for trimming the tape to fit neatly around detailed areas, ensuring that no paint correction solution inadvertently affects surfaces that do not require treatment.
Tips for Effective Masking
When preparing for a paint correction service, effective masking is crucial to protect areas that should not be corrected. Use high-quality masking tape designed for automotive applications, as it will adhere well to the surface while also ensuring clean lines. Apply the tape around areas such as trim, windows, and lights. For curves or contours, consider using a flexible tape that can easily follow the shape of the car. Ensure the surface is clean and dry before applying the tape to enhance adhesion and prevent any paint from seeping under it.
In addition to masking tape, using masking film or paper can provide extra protection for larger areas. This film can cover sections like the windshield or door handles and help keep overspray and dust from affecting the surfaces. When applying the film, overlap the edges of the tape for a tighter seal, and press down firmly to avoid any wrinkles. Take your time during this process, as attention to detail will yield better results and help maintain the integrity of your vehicle's features.
FAQS
What is paint correction and why is it necessary?
Paint correction is a process that involves removing imperfections from a vehicle's paint surface, such as scratches, swirl marks, and oxidation. It is necessary to restore the paint's clarity and shine, enhancing the overall appearance of the car.
How can I inspect my car for damage before a paint correction service?
To inspect your car for damage, move it into good lighting and examine the paint surface closely. Look for scratches, swirl marks, and any areas of fading or oxidation. Using your hand, feel for rough patches, which may indicate contaminants.
What is the purpose of using clay bars during the preparation process?
Clay bars are used to decontaminate the paint surface by removing bonded contaminants like dirt, tree sap, and industrial fallout that regular washing cannot eliminate. This step ensures a smooth surface for effective paint correction.
How do I effectively mask areas of my car that shouldn't be corrected?
To effectively mask areas, use high-quality painter's tape and overlap the edges to ensure complete coverage. Focus on sensitive areas such as trim, rubber seals, and plastic components. Take your time to ensure precision for the best results.
Is there anything else I should do before my paint correction appointment?
Yes, make sure your car is clean and dry before the appointment. Remove any personal items from the vehicle and consider detailing the interior as well, as this will create a more pleasant environment for the technician while they work on your car’s exterior.
Related Links
How Weather Affects Car Paint and Correction ApproachesProfessional vs DIY Paint Correction: What You Need to Know
Long-Term Benefits of Regular Paint Correction
The Role of Paint Correction in Enhancing Vehicle Value